Getting started with Unity
Last updated onThis guide shows how to create a simple Unity client application that using MagicOnion. In this guide, we will create a simple Unity application that calls an API service implemented in a .NET server to add two numbers.
This guide assumes the following environment to create a server and client:
- Windows or macOS
- .NET 8 SDK or later
- Unity 2022.3 or later or Unity 6 (6000.0.34f1) or later
Some versions of Unity 6 have issues with Source Generator, so use 6000.0.34f1 or later.
Use a pre-configured template (optional)
This guide shows how to create a project, install packages, and other steps. You can get a template in the completed state of this guide from the MagicOnion.Template.Unity repository.
You can start development using the template by downloading the repository as an archive file from GitHub or by creating a repository from the GitHub template. For more information, see How to create a repository from a template on GitHub.
How to use the template
This template based on the "Universal 3D" template using Unity 6000.0.36f1.
How to set up
You can download the archive file from GitHub and extract it, or create a repository from the GitHub template feature. The following is an example command to extract the template to the MyApp directory.
- Windows (cmd.exe)
- Windows (PowerShell)
- Bash, zsh
mkdir MyApp
cd MyApp
curl.exe -L -o - https://github.com/Cysharp/MagicOnion.Template.Unity/archive/refs/heads/main.tar.gz | tar xz -C . --strip-component 1
mkdir MyApp
cd MyApp
curl.exe -L -o - https://github.com/Cysharp/MagicOnion.Template.Unity/archive/refs/heads/main.tar.gz | tar xz -C . --strip-component 1
mkdir MyApp
cd MyApp
curl -L -o - https://github.com/Cysharp/MagicOnion.Template.Unity/archive/refs/heads/main.tar.gz | tar xz -C . --strip-component 1
After extracting the source code, run init.cmd or init.sh with an arbitrary project name (e.g., MyApp). This script performs preparation such as renaming projects and files in the repository root.
- Windows (cmd.exe)
- Windows (PowerShell)
- Bash, zsh
init.cmd MyApp
init.cmd MyApp
bash init.sh MyApp
After running the script, you can delete init.sh and init.cmd and tools/RepoInitializer that actually perform the rewriting process.
- Open
src/MyApp.Unityas a Unity project from Unity Hub. - Sample implementation is included in
SampleScene. - To open the project, select
Assets->Open C# Projectfrom the menu in the Unity Editor. - To run the server, start the
MyApp.Serverproject in Visual Studio or Rider.
The template is configured based on the contents of this quick start guide, so refer to this guide for details.
License
The repository is provided under the CC0 - Public Domain license.
Setup the projects
First, create a .NET server and Unity client, and a project to share code between them. The .NET server is created as a solution (.sln) and project (.csproj) like a typical .NET application, and the Unity client is created as a Unity project from Unity Hub.
The directory structure of the project to be created in this guide follows the structure described in Project Structure and will be as follows:
(Repository Root)
├─ MyApp.sln
└─ src
   ├─ MyApp.Server
   │  ├─ MyApp.Server.csproj
   │  └─ ...
   ├─ MyApp.Shared
   │  ├─ MyApp.Shared.csproj
   │  └─ ...
   └─ MyApp.Unity
      ├─ Assembly-CSharp.csproj
      └─ ...
Create a .NET server and shared library project
First, create a .NET server and shared library project. Here, we will create an ASP.NET Core gRPC server and a class library project and solution as in the Quickstart with .NET client and server.
You can create a solution, server project, and shared library project, and add MagicOnion-related packages and references between projects at once by running the following command:
- Windows (cmd.exe)
- Windows (PowerShell)
- Bash, zsh
Set MO_PROJECT_NAME=MyApp

dotnet new gitignore
dotnet new grpc -o src/%MO_PROJECT_NAME%.Server -n %MO_PROJECT_NAME%.Server
dotnet new classlib -f netstandard2.1 -o src/%MO_PROJECT_NAME%.Shared -n %MO_PROJECT_NAME%.Shared

dotnet new sln -n %MO_PROJECT_NAME%
dotnet sln add src/%MO_PROJECT_NAME%.Server --in-root
dotnet sln add src/%MO_PROJECT_NAME%.Shared --in-root

pushd src\%MO_PROJECT_NAME%.Server
dotnet remove package Grpc.AspNetCore
dotnet add package MagicOnion.Server
dotnet add reference ../%MO_PROJECT_NAME%.Shared
popd

pushd src\%MO_PROJECT_NAME%.Shared
dotnet add package MagicOnion.Abstractions
popd
$MO_PROJECT_NAME="MyApp"

dotnet new gitignore
dotnet new grpc -o "src/$MO_PROJECT_NAME.Server" -n "$MO_PROJECT_NAME.Server"
dotnet new classlib -f netstandard2.1 -o "src/$MO_PROJECT_NAME.Shared" -n "$MO_PROJECT_NAME.Shared"

dotnet new sln -n "$MO_PROJECT_NAME"
dotnet sln add "src/$MO_PROJECT_NAME.Server" --in-root
dotnet sln add "src/$MO_PROJECT_NAME.Shared" --in-root

pushd "src/$MO_PROJECT_NAME.Server"
dotnet remove package Grpc.AspNetCore
dotnet add package MagicOnion.Server
dotnet add reference "../$MO_PROJECT_NAME.Shared"
popd

pushd "src/$MO_PROJECT_NAME.Shared"
dotnet add package MagicOnion.Abstractions
popd
MO_PROJECT_NAME=MyApp

dotnet new gitignore
dotnet new grpc -o src/$MO_PROJECT_NAME.Server -n $MO_PROJECT_NAME.Server
dotnet new classlib -f netstandard2.1 -o src/$MO_PROJECT_NAME.Shared -n $MO_PROJECT_NAME.Shared

dotnet new sln -n $MO_PROJECT_NAME
dotnet sln add src/$MO_PROJECT_NAME.Server --in-root
dotnet sln add src/$MO_PROJECT_NAME.Shared --in-root

pushd src/$MO_PROJECT_NAME.Server
dotnet remove package Grpc.AspNetCore
dotnet add package MagicOnion.Server
dotnet add reference ../$MO_PROJECT_NAME.Shared
popd

pushd src/$MO_PROJECT_NAME.Shared
dotnet add package MagicOnion.Abstractions
popd
The commands shown here are a series of commands that perform the following operations. If you are familiar with .NET, you can manually configure these operations using Visual Studio or Rider.
- Create an ASP.NET Core gRPC server project (MyApp.Server)
- Create a class library project for shared libraries (MyApp.Shared)
- Create a solution file (MyApp.sln)
- Add MyApp.Server and MyApp.Shared to the solution
- MyApp.Server
- Add the MagicOnion.Server package
- Add a reference to the MyApp.Shared project
- MyApp.Shared
- Add the MagicOnion.Abstractions package
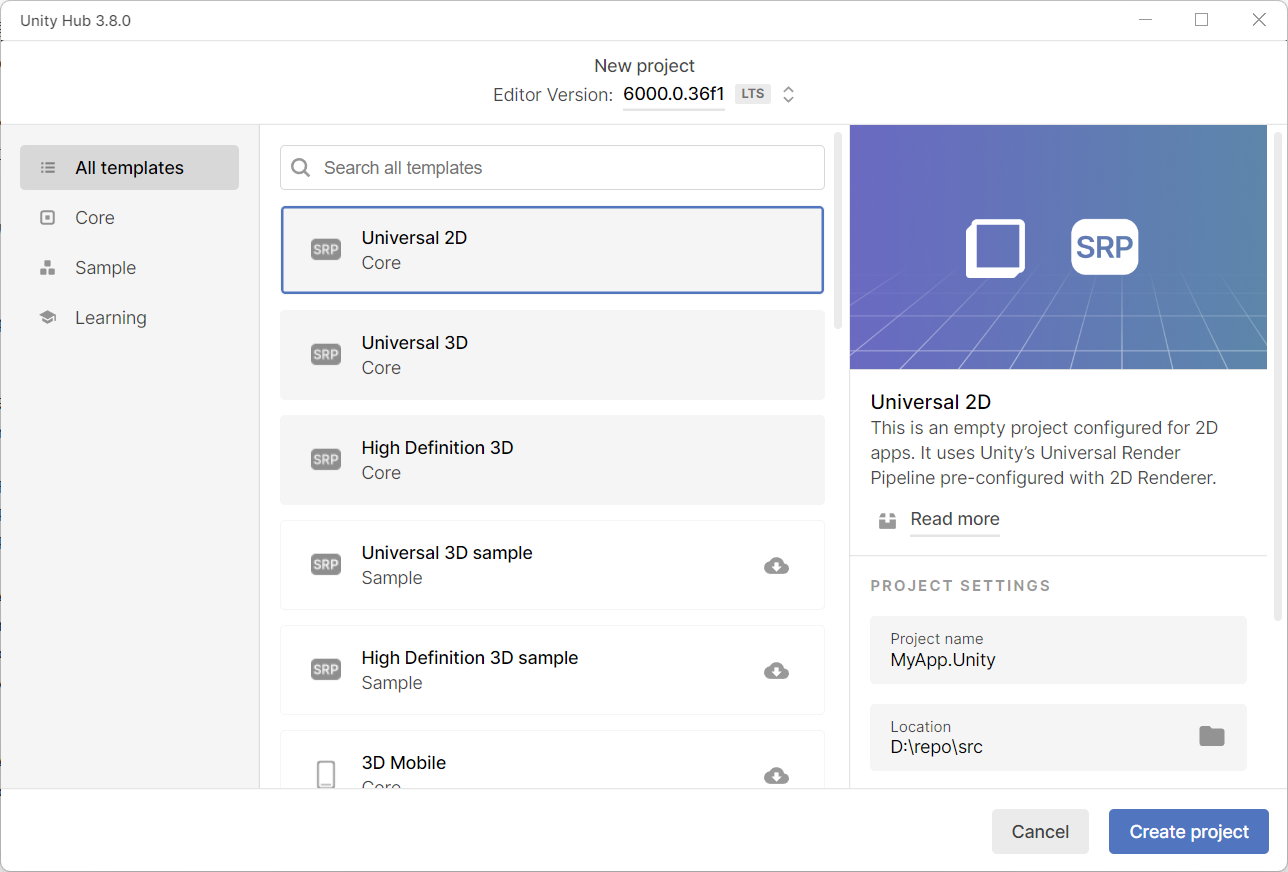
Create a Unity project
Next, create a Unity project in the src/MyApp.Unity directory. Create a Unity project from Unity Hub.
You can choose any template you like, such as "Universal 2D" or "Universal 3D".
After creating the Unity project, the directory structure should look like this:
(Repository Root)
│  MyApp.sln
└─src
    ├─MyApp.Server
    ├─MyApp.Shared
    └─MyApp.Unity
Open the project in an IDE
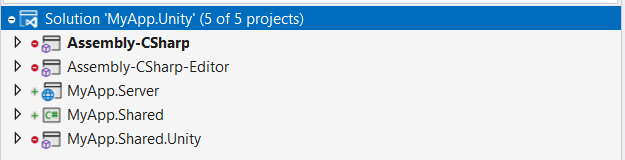
You can open MyApp.sln in Visual Studio or Rider to open the MyApp.Server and MyApp.Shared projects.
.sln files are called solutions and bundle multiple projects together. By opening a solution in an IDE such as Visual Studio or Rider, you can manage multiple projects such as servers, clients, and class libraries together.
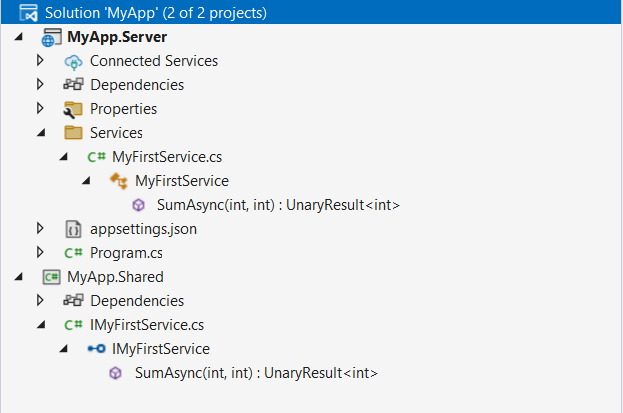
Define an API service
In MagicOnion, the API services provided by the server to the client are defined as .NET interfaces. By defining the service interface, you can share it between the server and the client, and use it for server implementation and client calls.
Add an interface definition that defines the service to the project MyApp.Shared. This project is a project for sharing code between the server and the client.
In this section, we define a simple calculation service interface IMyFirstService. The interface takes two int values x and y and returns the sum of the two values in the SumAsync method.
using MagicOnion;

namespace MyApp.Shared
{
    public interface IMyFirstService : IService<IMyFirstService>
    {
        UnaryResult<int> SumAsync(int x, int y);
    }
}
This is a typical .NET interface definition and is almost the same as a general .NET interface definition, but note that it implements IService<T> and the return type is UnaryResult.
IService<T> is an interface that indicates that this interface is a Unary service. A Unary service is an API service that returns one response for one request. For more information, see Unary Fundamentals.
The return type must be UnaryResult<T> or UnaryResult, which is treated as an asynchronous method like Task or ValueTask. UnaryResult<int> here indicates that it receives an int value from the server. Since the API is always asynchronous, you need to use UnaryResult, and it is recommended to add the Async suffix to the method name.
The project created from the template already contains a Class1.cs, so delete it from the project.
Implement the server
After defining the service interface, you need to implement the service in the server project MyApp.Server.
Initial server configuration
First, delete the gRPC sample implementation that is added by default when creating the template. The sample implementation is included in the Protos folder and the Services folder, so delete these folders.
Next, configure the server startup in Program.cs. The ASP.NET Core application configures the server functionality in Program.cs.
In Program.cs, call builder.Services.AddMagicOnion() and app.MapMagicOnionService() to enable the MagicOnion server functionality. Remove the using MyApp.Server.Services and builder.Services.AddGrpc(); and app.MapGrpcService<GreeterService>(); that are written at creation.
The Program.cs with these settings looks like this:
var builder = WebApplication.CreateBuilder(args);

// Add services to the container.
builder.Services.AddMagicOnion();

var app = builder.Build();

// Configure the HTTP request pipeline.
app.MapMagicOnionService();
app.MapGet("/", () => "Communication with gRPC endpoints must be made through a gRPC client. To learn how to create a client, visit: https://go.microsoft.com/fwlink/?linkid=2086909");

app.Run();
MyApp.Server.csproj may contain Protobuf items. If they are present, they are not needed, so delete them.
  <ItemGroup>
    <Protobuf Include="Protos\greet.proto" GrpcServices="Server" />
  </ItemGroup>
Implement the API service
Next, implement the API service that processes the request from the client.
In this guide, we defined the IMyFirstService interface as the service definition, so the API service (Unary service) implementation class must implement this interface. The implementation class also needs to inherit the ServiceBase<T> base class.
Based on this, create the MyFirstService class in the Services folder. The following is an example of the class implementation:
using MagicOnion;
using MagicOnion.Server;
using MyApp.Shared;

namespace MyApp.Server.Services;

// Implements RPC service in the server project.
// The implementation class must inherit `ServiceBase<IMyFirstService>` and `IMyFirstService`
public class MyFirstService : ServiceBase<IMyFirstService>, IMyFirstService
{
    // `UnaryResult<T>` allows the method to be treated as `async` method.
    public async UnaryResult<int> SumAsync(int x, int y)
    {
        Console.WriteLine($"Received:{x}, {y}");
        return x + y;
    }
}
In this section, we created Services folder but there are no restrictions on the folder structure.
UnaryResult is treated as an asynchronous method like Task or ValueTask.
Check the server startup
So, the server implementation is complete. Let's start the server and check if it works. Start the server by running the server project in Visual Studio or Rider, or by running the dotnet run command in the terminal.
If there are no build errors and the server starts up successfully, the following log will be output, and the server will start. The http://... displayed at this time is the URL to connect from the Unity client later, so it is recommended to make a note of it.
info: Microsoft.Hosting.Lifetime[14]
      Now listening on: https://localhost:7071
info: Microsoft.Hosting.Lifetime[14]
      Now listening on: http://localhost:5210
info: Microsoft.Hosting.Lifetime[0]
      Application started. Press Ctrl+C to shut down.
info: Microsoft.Hosting.Lifetime[0]
      Hosting environment: Development
info: Microsoft.Hosting.Lifetime[0]
      Content root path: D:\repo\src\MyApp.Server
The directory and file structure should look like follows. The server-related work is now complete.
(Repository Root)
├─ MyApp.sln
└─ src
   ├─ MyApp.Server
   │  ├─ MyApp.Server.csproj
   │  ├─ Program.cs
   │  └─ Services
   │     └─ MyFirstService.cs
   └─ MyApp.Shared
      ├─ MyApp.Shared.csproj
      └─ IMyFirstService.cs
Implement the Unity client
Next, implement the Unity client that calls the server. Open the Unity project MyApp.Unity in the Unity Editor.
Install MagicOnion and related packages
First, you need to install some packages to use MagicOnion in the Unity project. You need to install the following three packages:
- NuGetForUnity
- MagicOnion.Client + Unity extension
- YetAnotherHttpHandler
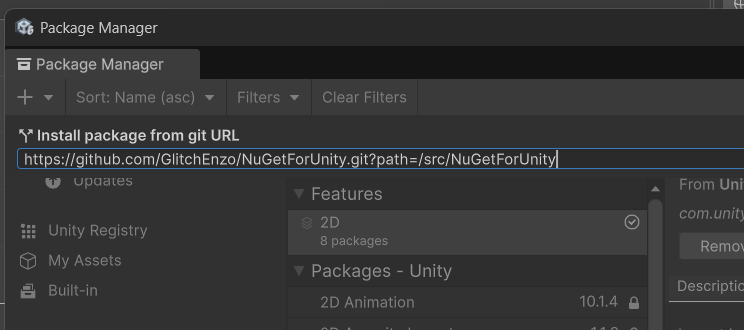
Install NuGetForUnity
MagicOnion is provided as a NuGet package, so you need to install the extension NuGetForUnity to install NuGet packages in Unity.
To install NuGetForUnity, specify the following URL in the Package Manager's Add package from git URL.... For more information, see the README of NuGetForUnity.
https://github.com/GlitchEnzo/NuGetForUnity.git?path=/src/NuGetForUnity
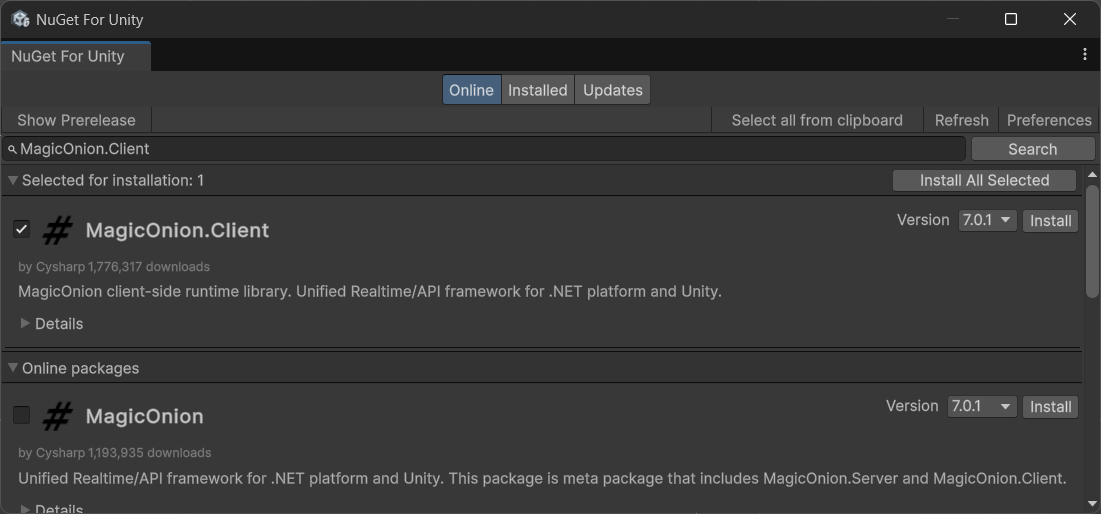
Install MagicOnion.Client + Unity extension
MagicOnion.Client, which is the client library for MagicOnion, is provided as a NuGet package, so install it using NuGetForUnity.
From the Unity Editor's menu, select NuGet → Manage NuGet Packages, search for MagicOnion.Client in the NuGetForUnity window, and install it.
Next, install the Unity package that contains the Unity extension. In the Package Manager, select Add package from git URL... and specify the following URL:
https://github.com/Cysharp/MagicOnion.git?path=src/MagicOnion.Client.Unity/Assets/Scripts/MagicOnion.Client.Unity#7.0.2
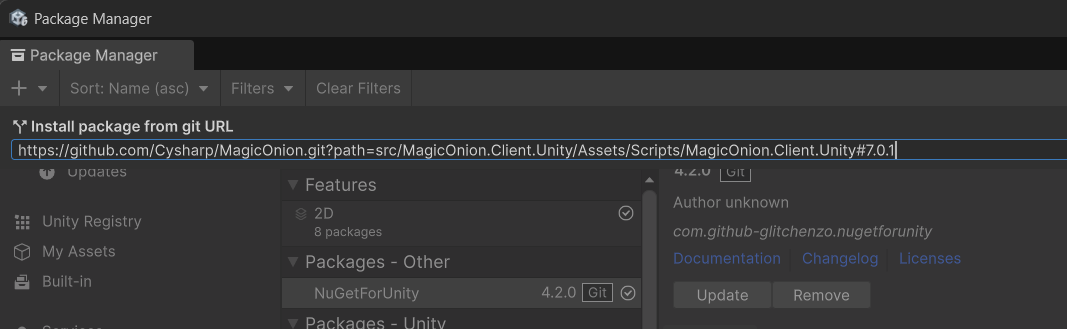
7.0.2 is the installation version, and a newer version may be available depending on the released version.
Install YetAnotherHttpHandler
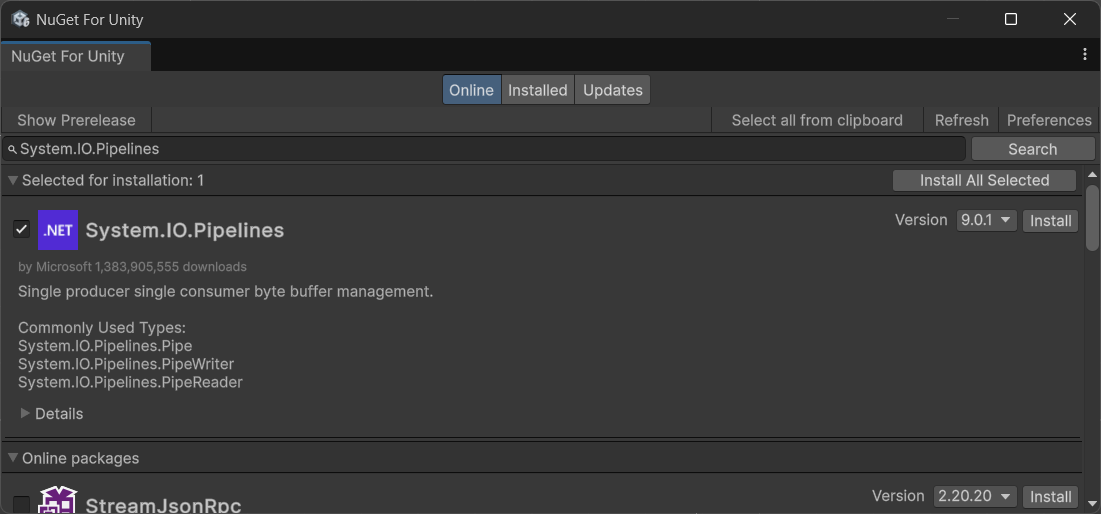
Finally, install YetAnotherHttpHandler, a communication library for gRPC (HTTP/2) communication in Unity, to use gRPC (HTTP/2) communication with Unity. The installation of YetAnotherHttpHandler requires two installation steps: installing the required NuGet packages and the YetAnotherHttpHandler itself.
First, install the NuGet package required for operation. Search for System.IO.Pipelines from NuGetForUnity and install it.
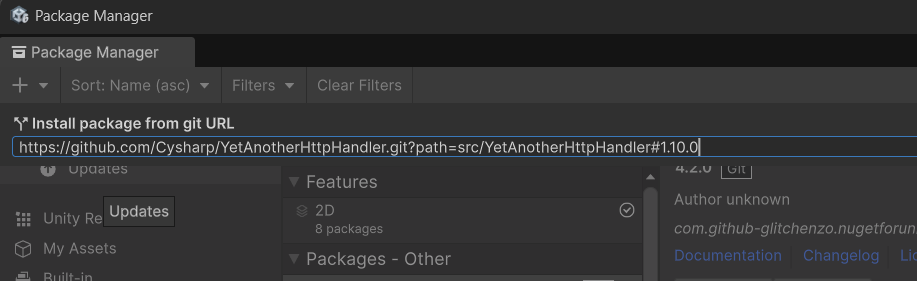
Next, install YetAnotherHttpHandler via Unity Package Manager. Specify the following URL in Add package from git URL... in the Package Manager:
https://github.com/Cysharp/YetAnotherHttpHandler.git?path=src/YetAnotherHttpHandler#1.10.0
1.10.0 is the installation version, and a newer version may be available depending on the released version.
For more detailed installation instructions, see the README of YetAnotherHttpHandler.
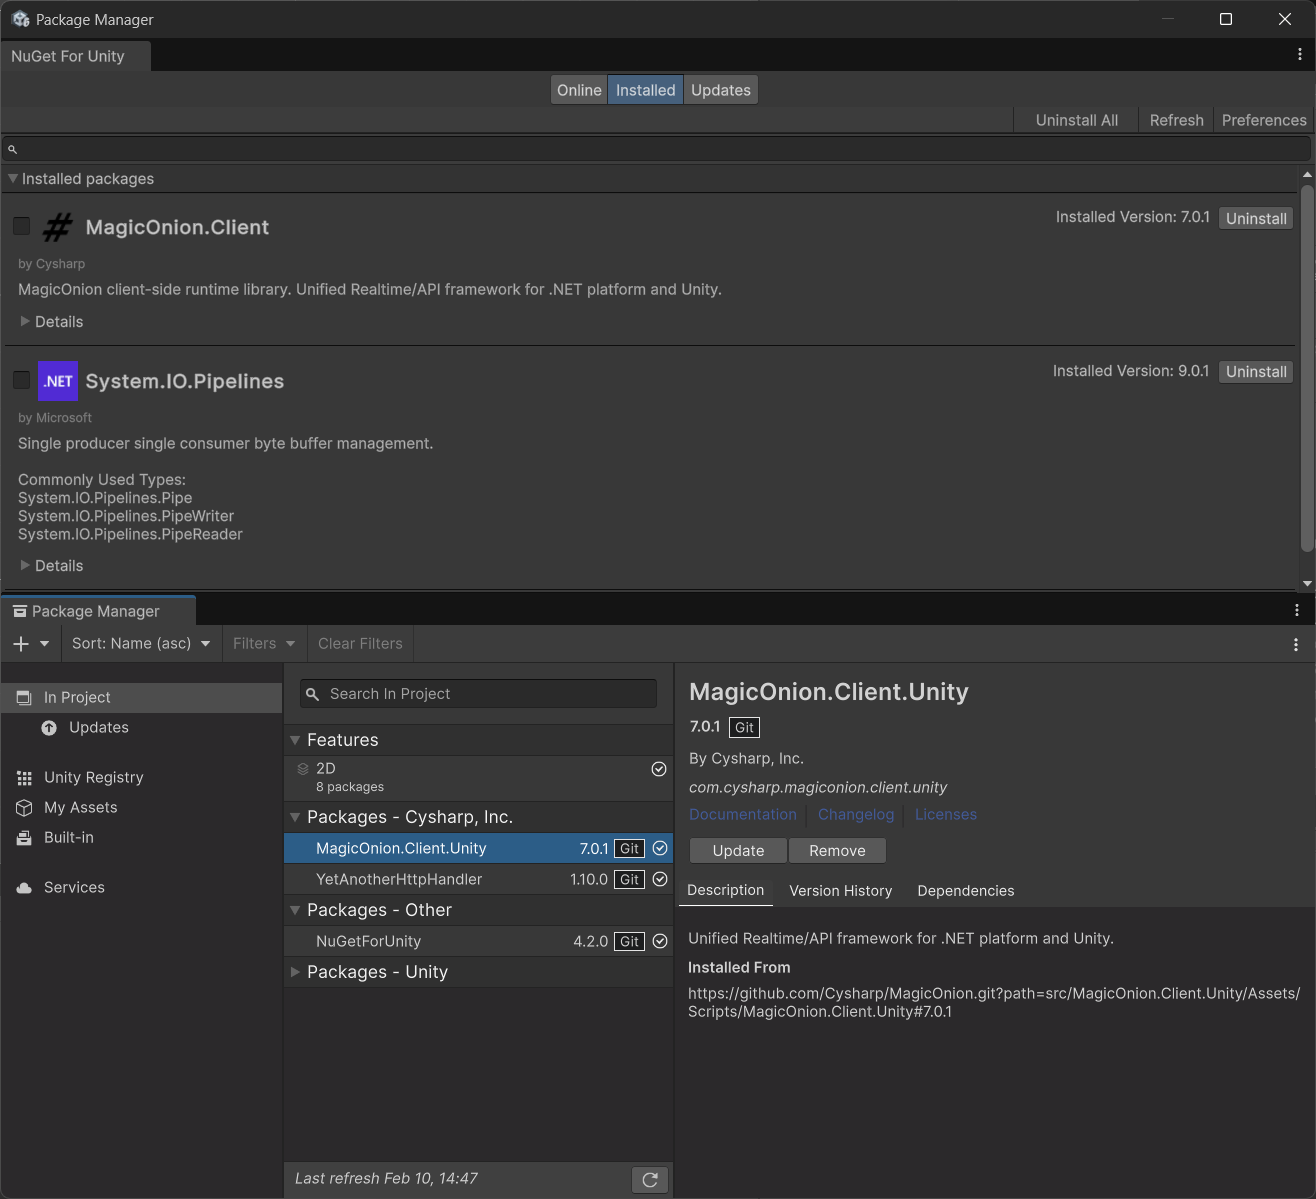
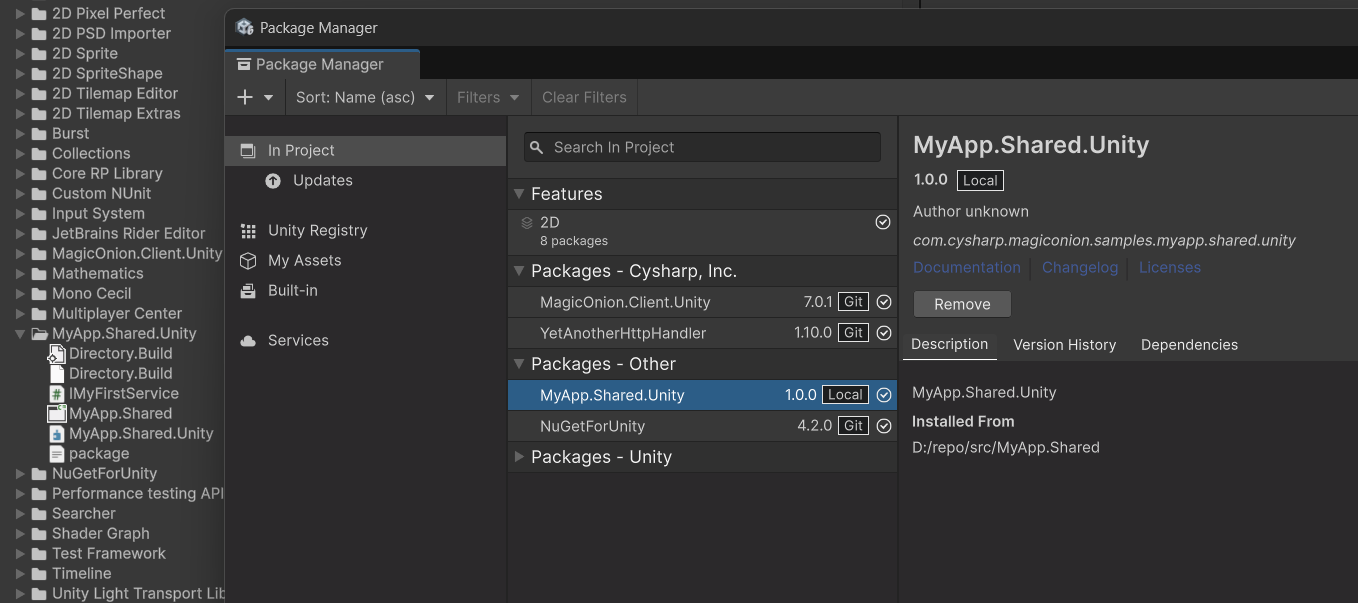
After installing the above packages, the list of packages (NuGet and UPM) in the Unity project should look like this:
Reference the shared service definition from the Unity project
To call the API from the Unity client, you need to reference the service definition from the Unity client. The service definition is defined in the MyApp.Shared project, but this is a .NET project and cannot be directly referenced from the Unity project.
There are two ways to share the service definition between the .NET server-side and Unity projects.
Method 1: Copy the file to share
The first method is to simply copy the source code file and share it. This method simply copies the IMyFirstService.cs file in MyApp.Shared to the Unity project.
The advantage of this method is that it is very easy to try because it only requires file copying. The disadvantage is that you need to manually copy the file when the file changes.
Method 2: Share as a local package
The second method is to treat the MyApp.Shared project as a Unity package. This method is recommended because it allows you to share the same file without copying it, and the file is automatically updated when the file changes. This method is recommended for MagicOnion development.
To treat the .NET class library project as a Unity local package, you need to take some additional steps.
First, add a package.json to the MyApp.Shared project. This file is required to be recognized as a package by Unity. Create a package.json file under MyApp.Shared with the following JSON content:
{
  "name": "com.cysharp.magiconion.samples.myapp.shared.unity",
  "version": "1.0.0",
  "displayName": "MyApp.Shared.Unity",
  "description": "MyApp.Shared.Unity"
}
Next, add an Assembly Definition file to make it a separate assembly in Unity. Add an Assembly Definition file to MyApp.Shared named MyApp.Shared.Unity.asmdef with the following content:
{
    "name": "MyApp.Shared.Unity"
}
The file name of the Assembly Definition file is used as the project name when opening the project from Unity. Therefore, it is recommended to add a .Unity suffix to distinguish it from MyApp.Shared.
Finally, add Directory.Build.props and Directory.Build.targets to the MyApp.Shared project. These files are used to configure the project not to output folders such as bin and obj (instead, output to .artifacts) and to hide Unity-specific files from the IDE.
<Project>
  <PropertyGroup>
    <!-- https://learn.microsoft.com/en-us/dotnet/core/sdk/artifacts-output -->
    <ArtifactsPath>$(MSBuildThisFileDirectory).artifacts</ArtifactsPath>
  </PropertyGroup>
</Project>
<Project>
  <!-- Hide Unity-specific files from Visual Studio and .NET SDK -->
  <ItemGroup>
    <None Remove="**\*.meta" />
  </ItemGroup>

  <!-- Hide build artifacts from Visual Studio and .NET SDK -->
  <ItemGroup>
    <None Remove=".artifacts\**\**.*" />
    <None Remove="obj\**\*.*;bin\**\*.*" />
    <Compile Remove=".artifacts\**\**.*" />
    <Compile Remove="bin\**\*.*;obj\**\*.*" />
    <EmbeddedResource Remove=".artifacts\**\**.*" />
    <EmbeddedResource Remove="bin\**\*.*;obj\**\*.*" />
  </ItemGroup>
</Project>
When you add these files, be sure to build the project and delete the bin and obj folders if they remain. Leaving the files may cause problems with Unity.
In macOS Finder, files starting with . are hidden by default. If the .artifacts folder is not displayed, you may need to press Command + Shift + . in Finder to display it, or change the settings using the defaults command.
With these steps, the MyApp.Shared project should have the following file structure:
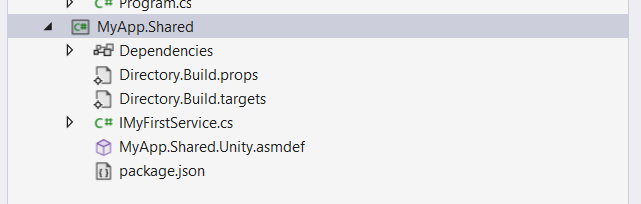
(Repository Root)
└─ src
   └─ MyApp.Shared
      ├─ Directory.Build.props
      ├─ Directory.Build.targets
      ├─ IMyFirstService.cs
      ├─ MyApp.Shared.Unity.asmdef
      ├─ MyApp.Shared.csproj
      └─ package.json
Reference the local package in the shared project
MyApp.Shared has been made available as a local package, so you need to add a reference to the local package in the Unity project.
To add a reference to a local package, add the path to the package in MyApp.Unity/Packages/manifest.json. Here, add file:../../MyApp.Shared as the relative path to the package.
{
  "dependencies": {
    "com.cysharp.magiconion.client.unity": "https://github.com/Cysharp/MagicOnion.git?path=src/MagicOnion.Client.Unity/Assets/Scripts/MagicOnion.Client.Unity#7.0.1",
    "com.cysharp.magiconion.samples.myapp.shared.unity": "file:../../MyApp.Shared",
    "com.cysharp.yetanotherhttphandler": "https://github.com/Cysharp/YetAnotherHttpHandler.git?path=src/YetAnotherHttpHandler#1.10.0",
    "com.github-glitchenzo.nugetforunity": "https://github.com/GlitchEnzo/NuGetForUnity.git?path=/src/NuGetForUnity",
    "com.unity.collab-proxy": "2.6.0",
    "com.unity.feature.2d": "2.0.1",
    ...
}
When installing a local package, be careful when installing it using the Unity Editor's Package Manager's Install package from disk... because it is saved in manifest.json with an absolute path.
Configure the MagicOnion client
To use MagicOnion in a Unity project, you need to initialize a provider host that manages gRPC connections. This is called a provider host.
Add a MagicOnionInitializer class that contains the following source code to the MyApp.Unity project.
using Cysharp.Net.Http;
using Grpc.Net.Client;
using MagicOnion.Unity;
using UnityEngine;

public class MagicOnionInitializer
{
    [RuntimeInitializeOnLoadMethod(RuntimeInitializeLoadType.BeforeSceneLoad)]
    public static void OnRuntimeInitialize()
    {
        // Initialize gRPC channel provider when the application is loaded.
        GrpcChannelProviderHost.Initialize(new DefaultGrpcChannelProvider(() => new GrpcChannelOptions()
        {
            HttpHandler = new YetAnotherHttpHandler()
            {
                Http2Only = true,
            },
            DisposeHttpClient = true,
        }));
    }
}
For more information about Unity integration, see Unity Integration.
Connect to the server and call the API
With the above steps, the preparation for using MagicOnion is complete. Now, implement the code to connect to the server from the Unity client and call the API. To simplify the explanation, we will implement the process of connecting to the server and calling the API in the Start method of MonoBehaviour. The implementation will connect to the server and call the API to output the result to the debug log.
First, create a gRPC channel to connect to the server. In MagicOnion, you can create a channel to connect to the server using the GrpcChannelx class. Here, we create a channel that connects to the address specified using the GrpcChannelx.ForAddress method. The address to be specified is the http://... displayed when the server was started in the section implementing the server.
var channel = GrpcChannelx.ForAddress("http://localhost:5210");
Next, create a client using the channel created above. To create a client, use the MagicOnionClient.Create method of the MagicOnionClient class. Specify the created channel and the API service interface. This creates a client that implements the IMyFirstService interface.
var client = MagicOnionClient.Create<IMyFirstService>(channel);
Finally, call the method using the client created above. This is same as calling a method of a normal interface. Since the method is an asynchronous method, you need to wait for the UnaryResult of the call result using await.
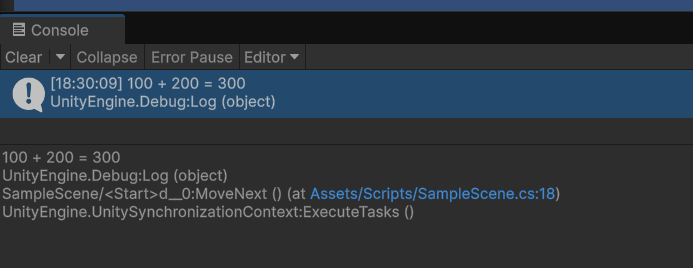
var result = await client.SumAsync(100, 200);
The above steps implemented in MonoBehaviour. Here, we create a SampleScene class as a MonoBehaviour to use in the SampleScene MonoBehaviour.
using System;
using MagicOnion;
using MagicOnion.Client;
using MyApp.Shared;
using UnityEngine;

public class SampleScene : MonoBehaviour
{
    // Start is called once before the first execution of Update after the MonoBehaviour is created
    async void Start()
    {
        try
        {
            var channel = GrpcChannelx.ForAddress("http://localhost:5210");
            var client = MagicOnionClient.Create<IMyFirstService>(channel);

            var result = await client.SumAsync(100, 200);
            Debug.Log($"100 + 200 = {result}");
        }
        catch (Exception e)
        {
            Debug.LogException(e);
        }
    }

    // Update is called once per frame
    void Update()
    {

    }
}
For the use of async void, it is recommended to avoid using it except for events such as Start. If you are using UniTask, it is recommended to use async UniTaskVoid instead of async void.
Finally, add a GameObject to the scene and attach the SampleScene script to the GameObject. This completes the preparation for connecting to the server from the Unity client and calling the API.
Enter Play mode in the Unity Editor to call the Start method, connect to the server, and execute the process to call the API. If 100 + 200 = 300 is displayed in the Console log, you have successfully connected to the server and called the API.
Troubleshooting
IOException: client error (Connect): tcp connect error: No connection could be made because the target machine actively refused it. (os error 10061)- The server is not running or the address is incorrect. Check the server address and whether the server is running.
IOException: client error (Connect): invalid peer certificate: UnknownIssuer- This error occurs when trying to connect to
https://.... This error occurs because the development certificate is not recognized. Connect usinghttp://...(be careful with the port number).
- This error occurs when trying to connect to
Integrate Unity and .NET server solutions
When you open C# code or projects from Unity Editor in a development environment such as Visual Studio or Rider, the solution generated by Unity Editor is opened (e.g., MyApp.Unity.sln). However, the .NET server project is not included in the solution generated by Unity Editor, so you need to open a separate solution (e.g., MyApp.sln) for server development and debugging.
Using the SlnMerge editor extension, you can integrate the Unity and .NET server solutions to enable seamless development.
Install SlnMerge
To install SlnMerge, specify the following URL in the Package Manager's Add package from git URL...:
https://github.com/Cysharp/SlnMerge.git?path=src

Configure SlnMerge
After installing SlnMerge, you need to create a SlnMerge configuration for the integration of solutions.
You need to create a configuration file with the name of the Unity Editor-generated solution file with .mergesettings appended.
For example, if you have MyApp.Unity project, MyApp.Unity.sln will be generated, so create a configuration file named MyApp.Unity.sln.mergesettings.
<SlnMergeSettings>
    <MergeTargetSolution>..\..\MyApp.sln</MergeTargetSolution>
</SlnMergeSettings>
Open the solution
To open the solution, double-click the C# file in the Unity Editor or select Assets → Open C# Project from the menu.
Next steps
This guide has shown how to build an API service using MagicOnion and communicate with it. For the next steps, refer to the following documents:
- Works with Unity
- If you want to use
Vector3and other Unity-specific types, refer to this document.
- If you want to use
- StreamingHub Fundamentals
- Basic usage of StreamingHub for real-time communication between servers and clients
- AOT Support (IL2CPP, Native AOT)
- Information for AOT builds for iOS, Android, and Windows
- Unity Integration
- Information on Unity Editor extensions for MagicOnion
- Project structure
- Recommended project structure for MagicOnion projects